If you have been sending RSS emails to your subscribers for any length of time you are probably ready to send a regularly scheduled newsletter.
Mailchimp makes it easy to create a newsletter template.
Need to see all the lessons in this series? Check out the Mastering Mailchimp page.
When you design a template that reflects your brand you can fill it with unique content and send it off to your readers. People appreciate helpful information. Because you are being so helpful they will open your campaigns regularly you you’ll get credit for having a healthy email list. This is good.
We can do this together. In ten easy steps you can put a Mailchimp newsletter template together and learn how all the pieces and parts work. I no time you’ll have an amazing newsletter ready to send to your subscribers.
{Updated for 2019}
Get into your Mailchimp account and CREATE A NEW CAMPAIGN. From the options choose the REGULAR CAMPAIGN.
 CHIMP TIP
As a beginner you will either choose a Regular campaign or an RSS campaign. You don’t need to worry about an A/B testing campaign and I have no idea why you would want to use a plain-text campaign. Avoid that one.
Choose the list you want to target with your campaign and then click NEXT. If you need help with groups and segments, I’ve got you covered.
Refresher: Remember you can get back to the dashboard by clicking the monkey in the upper left corner. The bottom gray bar is your progress bar. If this is new information to you, I suggest you start at the beginning.
Now, it’s time to get the details of this campaign.
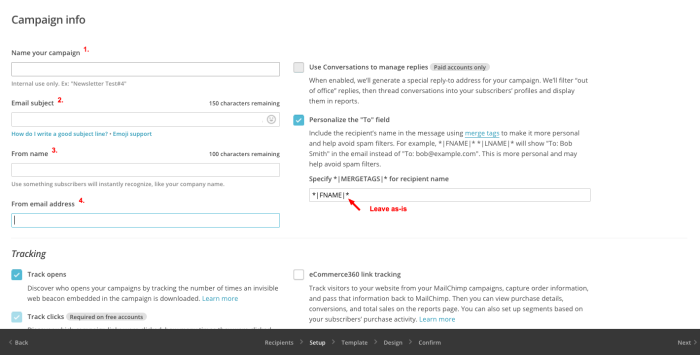
1. Name your campaign
This is only for your eyes. Your subscribers will not see the name of your campaign.
2. Email Subject
This section is VERY important in a newsletter. In an RSS campaign the email subject is auto-filled. However, in a newsletter campaign you must work hard on your email subject lines to keep your emails out of the SPAM box or it’s pointless.
Go ahead and click on the article under this section on how to write a good subject line. It may take you a few tries to get it right, but your open rate percentages on your reports will be key in letting you know what’s working and what isn’t.
Keep it personal. Pretend you are sending an email to a friend and write your subject line accordingly.
3. From Name
Mailchimp will default to your account name, but you can put your first name, your blog name, or whatever title you wish in this section. Just remember to keep it easy for readers to know who the email is from. Keeping it simple also keeps it out of the spam box.

4. From Email Address
If by chance you want to use a different email address than the one you used to sign up for Mailchimp, add it here.
That’s all you need to be worried about. There are some other default options and some choices you can make, but as a beginner, just leave everything else on this page as-is.
When you are done, click NEXT
Now we’re getting to the good stuff. The template. Currently, you are on the SELECT A TEMPLATE page.
If you scroll down this page you will see a lot of different options. You used the RSS template at the bottom to create your RSS campaign, but today you are going to use a pre-made template and customize it to match your blog.
In the menu bar at click THEMES.
OMChristmas Nuts! That’s a lot of templates.
And guess what? You get to use any one you want. Woop woop!
Take some time and scroll through this page. It’s so cool. The possibilities are endless.
Did you see a template you like? Make a note of it.
When you find a theme you want to use, choose SELECT. You can change your theme at any time.
For this lesson we are going to work together to create a Mailchimp newsletter template. Let’s use the POP-UP theme under the Newsletters section. You can either scroll for it or search for it at the top.
Click SELECT
Did you find it?
You should now be on a screen that looks like this

Using the same principles from lesson 16 you can full personalize the look of this mailchimp newsletter template. Are you ready?
We are going to build a newsletter template in ten crazy simple steps.
1. Use the DESIGN section to change the color of the PREHEADER and HEADER background.
Go ahead and match the colors of your blog. You will need to change the color of the background, the header container background and (after saving) move to the HEADER section and change the background there too.
2. Move back to the CONTENT module and edit the header.
Add your own header from your blog or create a new one to reflect your newsletter. Be sure to adjust the size in the image editor if necessary.
3. In the TEXT section under the header change the wording and make it a different color.
We’re learning the ropes here, so indulge me. Add a quote or your tagline.
4. Delete the next content box.
The one with the black and red image.
5. Now, add a divider.
Drag and drop a DIVIDER from the right edit pane to where the image used to be. Click the STYLE tab in the right edit pane. Change the color and weight of the divider. If you ever need help using any of the different types of content boxes Mailchimp has a tutorial ready for you.

6. In the next TEXT box add your own text and play with the editing options.
Knowing how each part works makes a big difference when it comes time to create your own customized template. Go ahead, have some fun with it.
7. Click the next red and black box.
This is an IMAGE CARD. You can add your own image and even changed the background color of the box in the STYLE section. Try it.
8. Delete the next two image cards.
Drag and drop BOXED TEXT and SOCIAL FOLLOW to replace them.
Change the color of the text and the outline of the box under the STYLE tab. Change the looks of the social follow buttons under SETTINGS
Play with this and see how it looks.
9. Edit the BUTTON in the next section to link to a page or post on your site.
Change the text and URL under CONTENT. Change the colors under STYLE. Make the button span full width under SETTINGS.
10. Add a TEXT box in the footer.
Put your affiliate statement here.
CHIMP TIP
Mailchimp autosaves your work every 20 seconds. You can click between content boxes without saving after each change you make if you wait for the autosave.
Preview and test your creation. How cool is that?
You just made your first newsletter template. Here’s how mine looks. How’s yours?
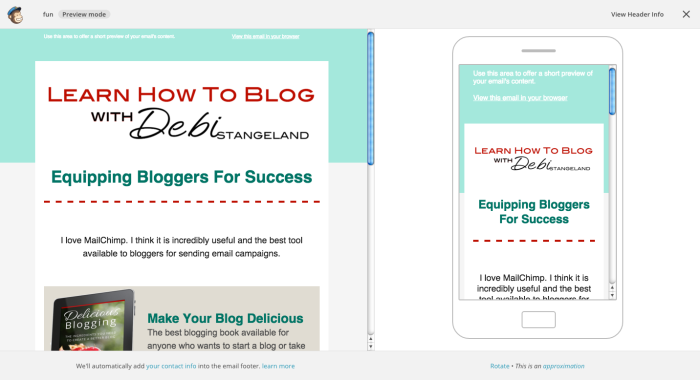
Now it’s time for you to create your own template. You can stick with this pre-made theme and customize it further or you can start over. As I stated earlier the possibilities are limitless.
The beauty of Mailchimp newsletters is the ease with which you can customize every part to reflect you and your blog.
Don’t forget to save your mailchimp newsletter template once you get it just the way you want it. Get all the elements you like in the order in which you want them. The content inside each box can be changed each time you send a newsletter. Your main goal is to get the basic elements locked in.
Once you get your content and design dialed in you can confirm your newsletter and schedule it or send it.

When you schedule your newsletter a new pane will be revealed and you can choose the date and time you want Mailchimp to deliver your creation to your subscribers. It really couldn’t be any easier.
You are awesome! You really have your act together and are on your way to serving your readers like never before. Well done.
#YouCanDoThis

Leave a Reply