
It’s time!
You’ve made it past the first, most important part of Mastering Mailchimp by setting up your list. You now how have sign up forms, confirmation forms, a thank you form and maybe even a thank you page on your blog. You are making great progress.
Now it’s time to make your list available to your readers. There are several options when it comes to getting readers signed up from your blog and on social media.
You can use signup boxes from Mailchimp, third-party plugins, integrations on social media, and Facebook tabs.
In this lesson we’re going to put your signup form onto your Facebook page. The tools for this are a little bit hard to find if you don’t know where to look. Don’t worry. Follow along and you’ll have your form up and running in no time.
{Updated for 2019}
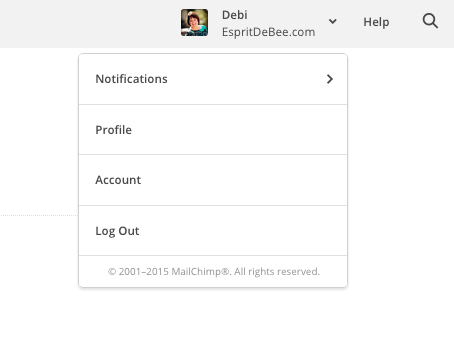
Start by signing into Mailchimp. When you get to the Dashboard, go to the top right corner. You will see your gravatar and your name. There is a small down arrow next to these, click it.
The drop down menu will give you several options about your account and your profile. Click the PROFILE option.
 This is your profile section and you can make changes to your account and your personal information here. But, today we’re going to head straight to INTEGRATIONS. Click.
You will see a directory of third-party platforms on which you can integrate your signup form. Most of these are for advanced users, however, the second option from the top is Facebook. Click it and log in
When Mailchimp logs into your account, you will be given some options for pages on which to place your form.
1. Choose the page
2. Choose the list you want it to pull from
3. Say YES to use signup form tab
4. Use My List Theme
5. Choose a label for your tab
6. Save
7. Test Connection

CHIMP TIP
When choosing a label for your Facebook tab keep it short. You only have a few characters to work with on Facebook. Sign Up, Email List, Free Download, Join Now, are all good options.
You can see your new tab on your Facebook page. Head over to your page. Mostly likely you won’t be able to see the tab yet, but it’s there. Click the SETTINGS tab at the top of your page, on the right.
Now click the TEMPLATES AND TABS option. From here you can see your new tab and drag it to the top of the list. Your list is now available from your tabs in Facebook.
Click the tab. You will be taken to a screen within Facebook that shows your signup form. Readers can subscribe right from here. Awesome, right?

There is one more area where you can encourage people to sign up for your email list. It’s a blue, clickable box right under your profile picture on the right.

Yours might say CUSTOMIZE. Go ahead and click it, then choose the Contact You section and click the Sign Up circle. At the bottom click NEXT.
Now, you are at Step 2. Click the Website Link box and enter your sign-up form’s unique URL.
You can find this in Mailchimp under the AUDIENCE tab at the top. Then click Manage Audience on the right side of the screen. When the menu drops down click Signup Forms.
From this screen choose the first option, yellow circle, Form Builder. When it opens the second box down will say Signup form URL. This is the unique URL for your sign up form online. You can put it anywhere (I keep mine on my Important Web Addresses list in Evernote so I have access to it at anytime.)
But back to where we were. Copy and paste this address into the Facebook Website Link box and click Finish.
Your Facebook visitors and fans can now sign up for your email list right from your Facebook page. You are rockin’ now!
Using the Facebook Mailchimp integration option is an important step in mastering Mailchimp. It is also an important part of giving your readers and fans plenty of ways to join your list.
#YouCanDoThis

[mc4wp_form id=”11788”]
Leave a Reply