How To Create An Effective Watermark For Your Blog Graphics

Do you know why an effective watermark is so important for your blog graphics?

It’s part branding and it’s part protection.

The bottom line is, you need to be using one.

It’s branding because it tells people where a graphic or picture originated from.

It’s protection because it keeps others from using your creative materials without giving you proper credit.

Both of these are important and both can be covered with a simple graphic, called a watermark, you create to add to all your blog graphics and photos.

This mark will identify your creations as your own. They will help with promotion of your site, protect your property, and ensure proper credit to your brand.

If you are new to the blogging game, creating a watermark for your photos and blog graphics isn’t difficult. You can make one right now. Let’s get started.

How To Create An Effective Watermark For Your Blog Graphics ★ Using a watermark for your blog graphics will expand the reach of your brand, protect your property, and help promote your site. You need to include one on every photo and graphic you create. Learn how with this simple tutorial.

{Updated for 2020}


Here’s a little cheat sheet for you to download and use as you create your own watermark:

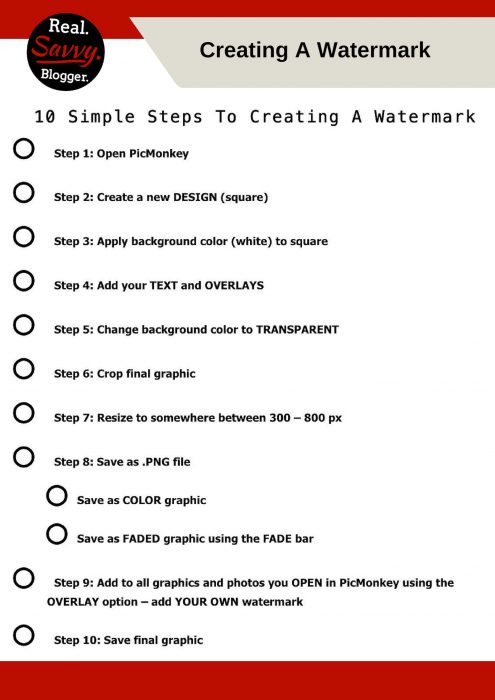
 Click here to download the PDF

Now comes the most important part. You must include this new watermark on your photos and graphics.

As you create graphics and photos for your posts, include your new watermark, in whatever form works best for you.

If you need some inspiration for creating your own watermark, be sure to check out Pinterest. As you scroll through the feed notice the different shapes, colors, and forms different watermarks take. You can be uber creative or wonderfully simple. You can use color or you can use shading. You can use a logo, your name, or your URL. The options are limitless.

Some things to look for as you peruse Pinterest are:

  • How do different fonts look?
  • How well do extra words or embellishments show up?
  • Where do others place their marks?
  • What size do others make their marks?
  • What colors look best?
  • Which marks catch your eye?
  • Which marks lend to the photos and which ones take away?

Keep all of these things in mind as you create your own watermark. Make sure it represents you and your blog with class and style.

UPDATE:

After using watermarks for over 10 years and rebranding multiple times, I have a little advice when it comes to watermarks.

  1. Wherever you place the watermark, make sure you can cover it easily if you rebrand.
  2. Use solids, as opposed to faded, transparent graphics, on pictures. So, if you need to rebrand it’s easier to cover with a new solid.
  3. Use transparent watermarks on printables and downloads.
  4. Keep it simple. The simpler the mark, the easier it is to change needed.

WARNING

Remember that throwing your watermark on any old picture you find online is NOT acceptable. Putting your mark on someone else’s photo is a no-no. A BIG one.

Only use a watermark on your own pictures and graphics or on legitimately public domain materials. Know before you mark. Not adhering to the rules is not only slimy, it’s also criminal. Some photographers won’t care about your excuses and can and will prosecute you to the full extent of the law. Not fun for a little blogger.

If you still aren’t convinced, read this.

The best way to protect yourself is – Don’t do it.


If you are ready to start sharing your own creations with your audience be sure to add an effective watermark to what you make. Share your brand and protect yourself for best results. Most importantly, have fun! I can’t wait to see what you come up with.

Are you ready to create your own watermark?

How To Create An Effective Watermark For Your Blog Graphics ★ Using a watermark for your blog graphics will expand the reach of your brand, protect your property, and help promote your site. You need to include one on every photo and graphic you create. Learn how with this simple tutorial.


Comments

13 responses to “How To Create An Effective Watermark For Your Blog Graphics”

  1. Nice one Debi. All my blog graphics are watermarked but I use either Ribbet or Canva for that purpose. One thing I have not managed to do so far is the batch edit to save time. Have you ever tried doing a few images with one batch command?

    1. Ahmad,

      I’ve never tried. Tell me more. That would be pretty handy wouldn’t it? Now I’m super curious.

      On another note, I’ve been checking out your site. Do you think it’s ok to add a usb hub to a Chromebook? We have a couple but seem to need more ports. Also, do you know of any video apps for screenshot videos for the Chromebook? Thought I’d pick your brain on this one.

      Thanks for reading. I appreciate it.

      1. Thanks Debi, yes the USB hubs are supported on Chromebooks so you can increase the number of ports by plugging one in.

        I would definitely recommend using Canva. The design, layouts, fonts and schemes are very elegant and give a professional feel to your finished work. It is free to use for the most part so nothing to be too concerned. Give it a try.

        Ribbet is a better version of Picmonkey in a sense that it gives many premium features for free which are available on cost in Picmonkey. Again, simple to use through their main website.

        Finally for capturing and screen-casting, SNAGIT extension by TechSmith is the recommended option. I have used it very briefly so won’t be able to tell you the details but it appears that it ticks the boxes.

        Good luck and keep in touch. Nice to be on your blog and learning the tips and tricks to expand my readership.

        1. Hi Ahmad, thanks for the Chromebook info.

          So yes, I am a Canva user. I like it for certain tasks but have found after using it extensively that it has some drawbacks I can only overcome in PicMonkey. One is transparency. I have yet to find someone who can explain to me how to make a graphic on a transparent background. Second, you can only use one font in each text box. If you want one word in a sentence to be in a different font, you have to add an additional text box. When moving text around this becomes tedious. Third, it is lousy for handling large amounts of text. What shows up properly in the edit box looks completely different on the final product. I am continuously creating half a graphic in Canva and polishing it in PicMonkey.

          At this point I am all about systemizing my processes and have found that the fastest way to create is in PicMonkey. For as cool as Canva is for small projects I’m always going back to the monkey. I haven’t tried Ribbet yet. I’ll have to check it out.

          Have a great weekend and P.S. I agree with your post on the NOTE. It is not too big for anyone. It’s a tech monster worth every penny. All hail the phablet!

          1. Debi – I agree that your requirements are such that you need to go to PicMonkey. At the end of the day whatever suits your requirements. Glad that you have exhausted the Canva options as well. It appears that you are a PRO when it comes to online image editing :))

            To overcome one of your problems, do you think this article will help?

            https://support.canva.com/hc/en-us/articles/200878430-How-do-I-make-an-image-or-graphic-transparent-in-Canva-

            For the other one , not exactly what you wanted but something close.

            https://designschool.canva.com/blog/the-ultimate-guide-to-font-pairing/

            Thanks for reading my blog and keep giving me your valuable advice. Happy to connect with you and I hope we can be mutually beneficial for our blogs. And lastly, sorry for taking up too much space on your commenting section. I hope you didn’t mind.

  2. Ahmad: You are so awesome. Thank you for those links. I’ve seen the first one, but will check out the second one for sure.

    Thanks for the great convo on this post. I love it. Take up all the space you want my friend.

  3. Great reminder!! I started off creating my graphics and watermarking my pictures using GIMP, but it’s not very user friendly (at least for the way my brain works) and I could never do exactly what I wanted.
    A few months ago I found an article that suggested making custom Pinterest board covers in PowerPoint. I tried it and loved it. Now I use PowerPoint for all my graphics! It’s not at all what the program was designed for, but it works so well.

    I now have 2 graphic files (or presentations if you want to be technical), one with slides the size for Pinterest and one with slides the size for sharing on Facebook and Twitter. I can create graphics so much faster buy just duplicating the previous slide and making some tweaks. My graphics now look much more similar (which I love for branding) and I’m saving so much time. I found out (after using the program for how many years???) that you can save individual slides as graphics. Transparency, font manipulation, etc. are all so easy to do in that program. I wish I would have thought to use that program earlier.

    1. Jennifer – I’m so glad you commented. I used PowerPoint for all my graphics for years and years. I love to make stuff in there. It’s a great way to do it. Thanks for reminding me of that sister. Happy Blogging!

  4. What size does the square need to be?

    1. Great question – 900×900

      Here’s my recommendations for the most ideal graphics sizes: https://realsavvyblogger.com/how-to-save-valuable-time-creating-your-blog-graphics/

    2. In PicMonkey?

      If yes, I click the T at the top (design) and it automatically opens a 2000×2000 square. Then I start to create my graphic, which can be square, rectangular, or whatever. Finally, I crop and resize the completed project to between 300 and 800px.

      Thanks for asking.

  5. Thank you so much, something so simple I almost overlooked. 🙂

    1. I’m so glad you found this helpful Amber. Have fun making your watermark.

      Happy blogging!

Leave a Reply

Your email address will not be published. Required fields are marked *